


In this article, we will take a closer look at the life cycle of angular components and the associated hook functions. In the first chapter you will get an overview and afterwards I will explain the life cycles in detail.
Lifecycle of Components
When running an Angular application, each component goes through several stages during his lifetime.
First, Angular creates the component.
Then, the associated template must be rendered so that the user can see it. During this process, the data bindings are built, which allows you to react to user interactions with your application and automatically make changes visible to the user.
Last but not least, it is possible that a component will be removed again. This can happen, for example, by using a structural directive like ngIf or ngFor, or by replacing the content when the route changes.
Of course, the above process also applies to all child components. Different states can also occur there, and they can also be removed or inserted. Therefore, Angular have also to take care of them.
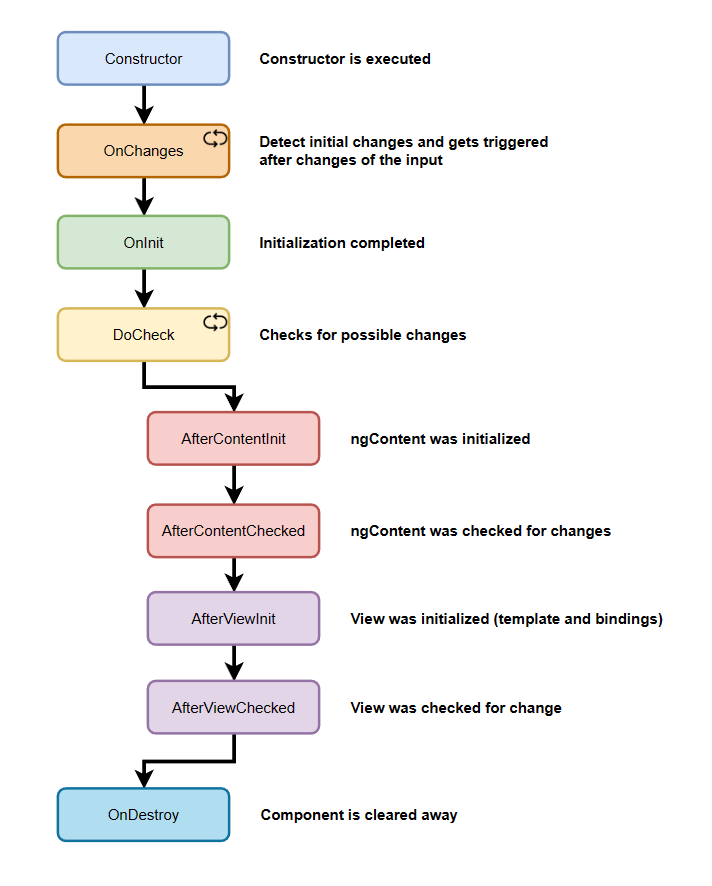
The following graphics give you an overview of when and in which order the lifecycle hooks are executed, the detailed explanation will follow in the next chapters.
Difference between Content and View
To better understand the concept of life cycle hooks, it is necessary to clarify the difference between the terms “content” and “view” in the Angular context. For this, we make a short excursion away from hooks and the component lifecycle.
Content
In Angular 2+, a feature for directives called Projection was introduced. Projection is the ability of components to contain other components if you use the component outside its own template, e.g. in a mother component. Here, between the opening and closing tag of the component other contents can be placed. This is then located outside the component itself, because the component works internally with its own template.
<my-custom-component>
    <my-custom-content>
    </my-custom-content>
</my-custom-component>
View
In contrast to the component content, a view stands for the real template of the component in connection with the data bindings (ViewModel). So, if you encounter any mention of View or ViewChildren, it is the actual template of the component or its child elements.
Each component defines a class that contains application data and logic, and is associated with an HTML template that defines a view to be displayed in a target environment.
// child.component.html
<h3>
    <p>Hello, my name is</p> // view
    <ng-content select=".content"></ng-content>
</h3>
// parent.component.html
<app-child>
    <p class="content"> John Doe</p>  // content
</app-child>
// Output in browser
Hallo, my name is
John Doe
Using hooks and interfaces
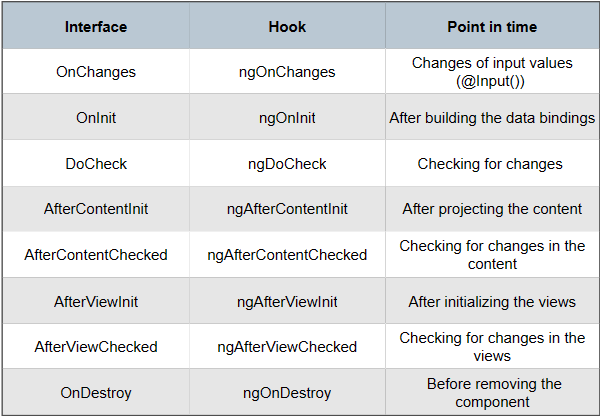
During software development, it is often necessary to react to certain events in the life cycle of a component. Therefore, Angular provides us with several interfaces that we can implement. Each interface expects the implementation of a function, which is executed when the corresponding event occurs. They are also called hooks. Angular offers the following hooks and interfaces, which are executed in the following order the first time they are used.
What does the whole thing look like in code now?
import { Component, OnInit } from '@angular/core';

@Component({
  selector: 'app-component',
  template: `<div>{{name}}</div>`
})
export class AppComponent implements OnInit {
  @Input name: string;

  constructor() {
    console.log(this.name); // undefined
  }

  ngOnInit() {
    console.log(this.name); // name is defined, if a value is set in parent
  }
}
Hooks explained
ngOnChanges
After the component has been created, the data bindings are set up in the first step. Thereby, already changes of the inputs can be present. These changes are then communicated to the ngOnChanges. The subsequent process for checking changes is called change detection in Angular. After each change detection, the ngOnChanges hook is executed if there are changes.
As a parameter, the function receives a so-called change object whose values are of the SimpleChange type. So Angular have custom types to represent changes.
import { Component, OnChanges, SimpleChange } from '@angular/core';

@Component({
    selector: 'app-component',
    template: `...`
})
export class AppComponent implements OnChanges {
  @Input() prop: number = 0;

  ngOnChanges(changes: SimpleChanges) {
    // changes.prop contains the old and the new value...
  }
}
ngOnInit
If you simply want to execute a function once after initializing the inputs, the ngOnInit hook is a good choice. It is executed after the first execution of the ngOnChanges hook to react to the initialization of the inputs.
The ngOnInit Hook is also the place for asynchronous code to be executed after the component is created. At this point, it would be important to mention that the constructor of a component should only be used for dependency injection. Everything else can be moved to the ngOnInit hook.
import { Component, OnInit } from '@angular/core';

@Component({
    selector: 'app-component',
    template: `...`
})
export class AppComponent implements OnInit {
  ngOnInit() {
    // ...
  }
}
ngDoCheck
The ngDoCheck hook is executed whenever the component is to check its input values for changes. This can happen very often, depending on the active change detection strategy.
In this process, an Angular application reacts internally to a variety of circumstances and interactions to start this process. Normally, this happens from the top component down to the last children. It doesn’t matter whether the changes are made in the current component or in a completely different part of the application. As an example, even a single click can trigger an update of all components.
ngAfterContentInit
Since we have already clarified above what a content is and what a view is, we can understand the following hooks more easily. The ngAfterContentInit hook is executed only once at the beginning, when the content between the component tags has been projected to the location of the ngContent. This completes the initialization of the component content, so to speak.
ngAfterContentChecked
After the content is initialized, it is checked once for possible changes. After that, this hook is closely linked to Angular’s change detection, which means it is also called quite frequently.
ngAfterViewInit
The lifecycle hook that is called immediately after Angular has completed initialization of a component’s view. It is invoked only once when the view is instantiated. What a View is explained above.
ngAfterViewChecked
Immediately after the views are created, they are checked for changes, since they might have changed again right away. After that, this hook is closely linked to Angular’s change detection, which means that it is called quite often.
ngOnDestroy
At some point, the lifecycle of a component also comes to an end, be it due to a change of route by the user or structural directives that remove the element from the DOM. This hook function is called just before the component is destroyed. Thus, this is the place to clean up the dependencies so that, no superfluous traces are left behind that are not picked up by the garbage collector and cause memory leaks. This would be, for example, to unsubscribe connections to observables or events.